TinyMCE 4 plugin Picasa - Google plus album and images plugin
A drag and drop plugin for the new tinyMCE 4 WYSIWYG editor.
Build with Bootstrap
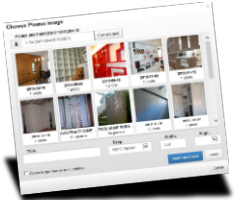
Get all albums and images from a Google+ or Picasa user, see a preview and insert into the tinyMCE 4 WYSIWYG editor
You can select some params like title, size, align or open larger image with a lightbox
( The user ID and the used image width will be saved in a cookie so you don't have to search for your ID all the time for one year ! )
Thank you for purchasing the TinyMCE 4 plugin Picasa - Google plus album and images plugin. If you have any questions that are beyond the scope of this help file, please feel free to email via my user page contact form here.
Markup Markup customization and highlights
General Markup
Drag and drop the picasa folder into the folder tinymce/plugins
Now add 'picasa' to the plugins: and toolbar:
Done !
<script type="text/javascript" src="<your installation path>/tinymce/tinymce.min.js"></script>
<script type="text/javascript">
tinymce.init({
    selector: "textarea",
    plugins: [
        "advlist autolink lists link image charmap print preview anchor",
        "searchreplace visualblocks code fullscreen",
        "insertdatetime media table contextmenu paste flickr"
    ],
    toolbar: "insertfile undo redo | styleselect | bold italic | alignleft aligncenter alignright alignjustify | bullist numlist outdent indent | link image picasa"
});
</script>

<form method="post" action="somepage">
    <textarea name="content" style="width:100%"></textarea>
</form>
Demo
Click on the ![]() icon to look at the demo
icon to look at the demo
Here some examples ID's you can use
115430471894051503835
113553632593702120194
or try your own google username to see if you have some albums on Google+
Example my Google+ username: cfconsultancy
or
dustingraves
Create and organize albums
If you want to create albums or organize them on Google+ read some help here
Output
If you want to change the output open tinymce/plugins/picasa/js/picasa.js
You will find some settings here which you can change
// Here you can set albums which you want to hide. (Remember to escape single quotes with an \)
var hiding_albums = ['Profile Photos', 'Scrapbook Photos', 'Instant Upload', 'Photos from posts'];
// Set option to choose lightbox popup
var lightbox = true;
// Set max width for the lightbox image
var full_width = 800;
// Set the relname
var relname = 'lightbox';
Explanations
First you go to Picasa or Google+ photo albums
In the url you will find your User ID
Example: https://picasaweb.google.com/103207751979264044331 then 103207751979264044331 is the User id
Example: https://plus.google.com/u/0/102757949097651603825/posts then 102757949097651603825 is the User id
Testing rss
If you think your album output is wrong you can check the rss output
Example: https://picasaweb.google.com/data/feed/base/user/116819315322131065179?alt=rss&kind=album&access=public&imgmax=800 where 116819315322131065179 is the User ID
Since Picasa went over to Google+ not albums are in place anymore. Sometimes double and so on. You can find more info about these issue's on the internet and build up or import your albums again.
lightbox
If you set the lightbox to true an a tag will be set around the small image with a link to the bigger image size and a rel="lightbox"
If you use a different rel name for a lightbox just change the 'relname'
You will have to set up your own lightbox system ! (not included)
Customization
For example language
Credits Files
I've used the following files as listed.
JavaScript
Once again, thank you so much for purchasing this plugin. As I said at the beginning, I'd be glad to help you if you have any questions relating to this app. No guarantees, but I'll do my best to assist.
Ceasar